
Starting a travel advisor business can feel overwhelming — especially when you’re not sure where to begin, what tools you actually need, or whether a host agency is the right move. If you’re stuck in that “Where do I even start?” stage, you’re not alone.
This guide gives you a clear, beginner-friendly roadmap. You’ll learn how to choose your niche, set up your business legally, pick the right tools, organize your workflow, build your online presence, and start booking clients with confidence.
Whether you’re doing this part-time or planning to grow into a full agency, these 10 steps will help you build a solid, professional foundation.
Want a shortcut? Grab the free Travel Advisor Startup Checklist at the end of this guide.
⭐ 10-STEP TRAVEL ADVISOR ROADMAP
Image Placeholder: Clean infographic showing 10 steps in connected boxes or arrows.
Step 1: Define Your Niche
Choosing your niche is one of the most important decisions you’ll make as a travel advisor. It shapes your messaging, helps you stand out, and tells clients exactly who you serve. Instead of trying to appeal to everyone, a niche makes your business clearer, more focused, and easier to grow.
Why choosing a niche matters
A well-defined niche helps clients instantly recognize whether you’re the right fit for them. It also simplifies your marketing, strengthens your supplier partnerships, and makes your content more consistent. Most new advisors struggle when their messaging is too broad — a niche fixes that.
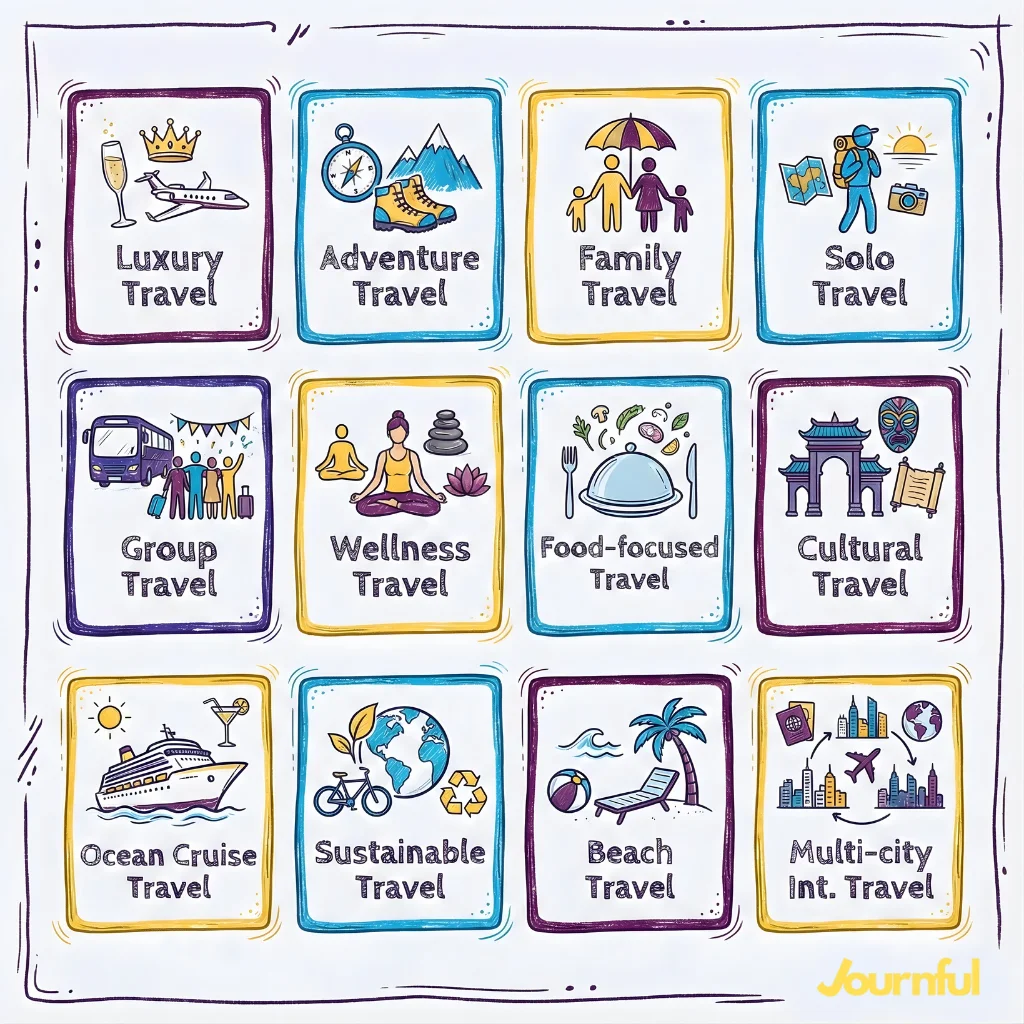
Popular Travel Niches to Consider
Here are some of the most in-demand types of travel to specialize in:
- Luxury travel
- Adventure travel
- Family travel
- Solo travel
- Group travel
- Wellness travel
- Food-focused travel
- Cultural travel
- Ocean cruise travel
- Sustainable travel
- Beach travel
- Multi-city international travel
How to confirm your chosen niche aligns with demand
You don’t need complicated research. Start simple:
- Browse real questions inside travel Facebook groups
- Look at what top advisors in that niche post
- Check what suppliers offer commissions for
- Search the niche online and look for content gaps
- Validate interest through conversations with travelers
For deeper guidance, see:
[LINK: Niche Guide]
Checklist
- Identify 1–2 target traveler types
- Check niche demand
- Compare 3–5 competitors
- Review supplier availability
Step 2: Research the Current Market and Your Ideal Client
Now that you’ve narrowed down your niche, it’s time to understand the type of traveler you’re targeting. Effective travel advisors study their clients’ behaviors and preferences so they can create services that solve real problems.
Understand Traveler Expectations
Today’s travelers expect a seamless, professional experience from the first inquiry to the final itinerary. Even if you’re just starting out, knowing these expectations helps you build a business that feels polished, reliable, and modern.
Most travelers now look for:
- Faster communication and clear updates
- Personalized recommendations tailored to their style and budget
- Transparent pricing with no surprises
- Trusted, vetted suppliers
- Flexible planning options
- Smooth digital onboarding and well-organized documents
When you design your workflow around these expectations, you instantly position yourself as traveler-friendly and service-focused.
Define Your Ideal Client Persona
An ideal client persona is a simple snapshot of the type of traveler who benefits most from your services. Consider demographics, preferred destinations, budget comfort level, and planning habits.
Ask yourself:
- Are they planners or procrastinators?
- Do they prefer adventure or slow-paced travel?
- What frustrates them about planning a trip?
The clearer the persona, the easier it becomes to create content, packages, and messaging that speak directly to them.
Identify the Problems You Solve
New advisors sometimes forget they aren’t selling trips — they’re selling time savings, personalization, and expertise.
Common traveler pain points include:
- Feeling overwhelmed by too many options
- Not knowing which suppliers are trustworthy
- Confusion around payment timelines and policies
- Wanting expert-backed recommendations
- Struggling to piece together complex itineraries
Identifying these early helps you communicate your value clearly and confidently.

Checklist: Step 2
- Validate findings in online communities
- Note booking behavior patterns
- Document client demographics
- List 4–5 pain points
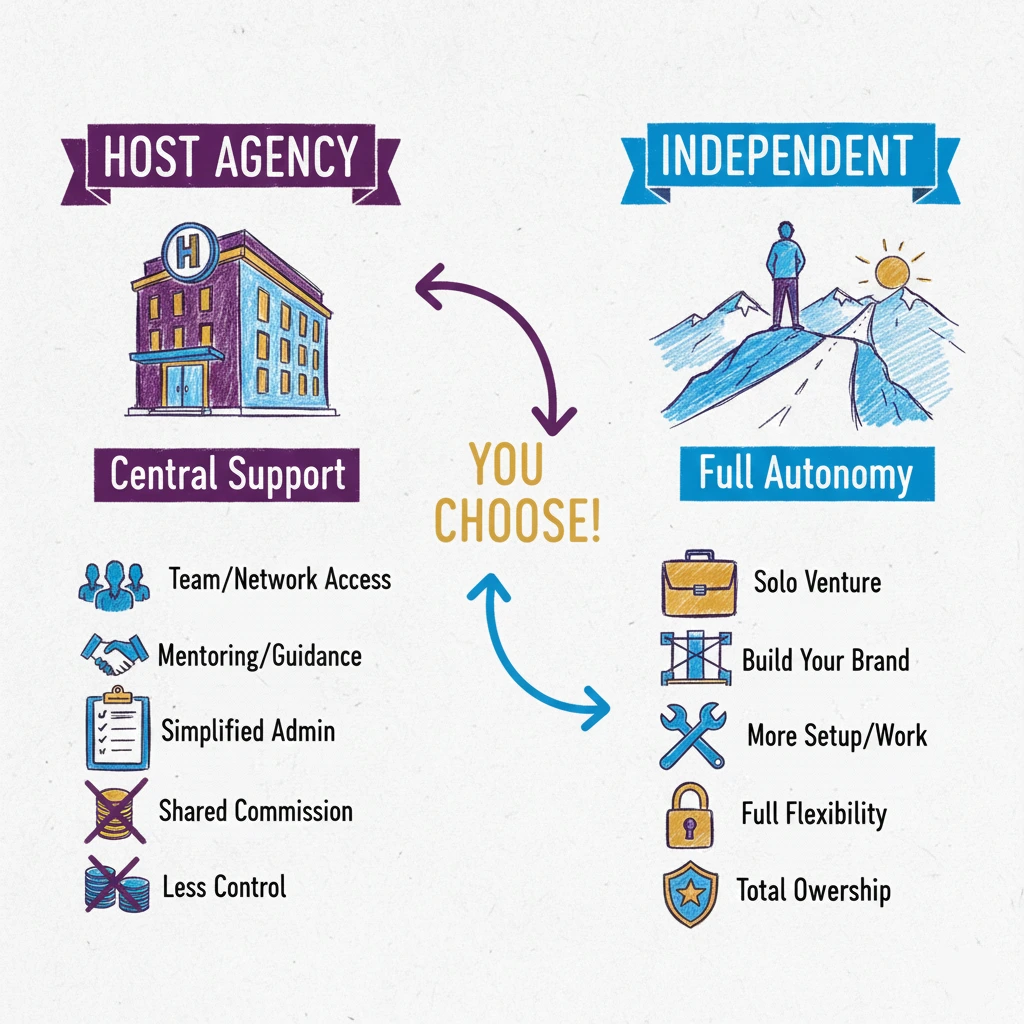
Step 3: Decide How You’ll Structure Your Business (Host Agency vs. Independent)
Before booking your first client, you need to decide how your business will operate. Most new travel advisors either join a host agency or work independently. This choice affects your startup costs, supplier access, support level, and the tools you use every day.
What a host agency is
A host agency provides accreditation, supplier relationships, training, and back-office systems. In exchange, you pay a monthly fee or share a percentage of your commissions.
For many advisors, a host acts like a business “starter kit” — giving you everything you need to begin selling travel quickly.
Pros & cons of joining a host agency
Pros:
- Lower startup cost
- Built-in accreditation (no need to obtain your own)
- Access to vetted suppliers and higher commission levels
- Ongoing support, training, and mentorship
- Simplified technology and back-office systems
Cons:
- Lower commission splits
- Must use their platform and workflows
- Possible fees (monthly, annual, or per booking)
A host agency is usually the easiest, fastest way for beginners to launch.
Pros & cons of going independent
Pros:
- Keep 100% of your commissions
- Full control over branding, systems, and client experience
- Maximum flexibility in how you run your business
Cons:
- Higher startup costs
- Must obtain your own accreditation and licensing
- More administrative work
- Slower setup if you’re brand new
Going independent makes sense once you have a proven workflow, steady clients, and confidence in managing supplier relationships on your own.
Checklist: Step 3
- Research 3–5 host agencies or independent options
- Compare commission split structures
- Evaluate technology and training offerings
- Choose based on your timeline, budget, and goals
Step 4: Set Up Your Business Legally
A basic legal setup establishes your business as a professional entity, allows you to accept payments properly, and ensures your finances are tracked cleanly. Requirements vary by location, but most travel advisors follow a similar set of foundational steps.
Register Your Business
Choose a business name and register it according to your local regulations. Depending on your goals and jurisdiction, you may register as a sole proprietorship, LLC, or corporation.
Check name availability, complete the required forms, and obtain any business identification or tax numbers needed to operate legally.
Licensing or Accreditation
Travel industry licensing varies widely by country and region. Some areas require seller of travel licenses, bonds, or special registrations, while others have few or no requirements.
Research your specific jurisdiction to understand what applies to you. If you join a host agency, much of the accreditation may be covered under the host’s credentials.
Voluntary certifications, such as those from The Travel Institute — can strengthen credibility even when not legally required.
Learn more:
See our full Travel Advisor Legal Setup Guide.
Basic Financial Setup
Open a dedicated business bank account to separate your personal and business finances. Set up a simple bookkeeping system to track income, expenses, commissions, and supplier payments. Choose invoicing or payment software that looks professional and allows clients to pay easily and securely.
Document everything from the start—clean records make tax filing easier and help you monitor your business performance.
IMAGE PLACEHOLDER: Minimal graphic showing registration documents and financial tools.
Checklist
- Register your business name with the appropriate authorities
- Open a separate business bank account
- Research and complete any required certifications or registrations
- Begin tracking all business expenses immediately
Step 5: Create Your Travel Service Packages and Pricing
Clear service packages establish expectations, define your value, and help clients understand what working with you includes.
What Travel Advisors Typically Offer
Most advisors build their packages around:
- Destination research and recommendations
- Supplier vetting and reservations
- Day-by-day itinerary creation
- Trip organization and document management
- On-trip support and issue resolution
Depending on your niche, you may add services like:
- Visa or entry requirement guidance
- Travel insurance coordination
- Dining or activity reservations
- Packing assistance
- Access to exclusive supplier perks
Your niche determines which services matter most — so start with a simple list, then refine it as you work with real clients.
How travel advisors earn money
Travel advisors generally earn income in two ways: supplier commissions and client service fees.
1. Supplier commissions
Hotels, tour operators, cruise lines, and other suppliers pay commissions — typically 10–20% of the booking value. Clients do not pay this directly; the supplier pays you after travel is completed.
2. Service fees
Fees ensure you’re compensated for planning time, regardless of commission levels. These can include:
- Flat planning fees (per trip or per itinerary)
- Consultation fees (hourly or per call)
- Administrative or change fees
- Premium concierge or customization fees
Most advisors use a hybrid model, charging service fees while earning commissions where available.
For deeper strategies, see the Travel Advisor Pricing Guide.
Setting Your Pricing
Start with a simple, easy-to-understand structure. Many new advisors launch with three tiers — Essential, Premium, and VIP, each offering different levels of support.
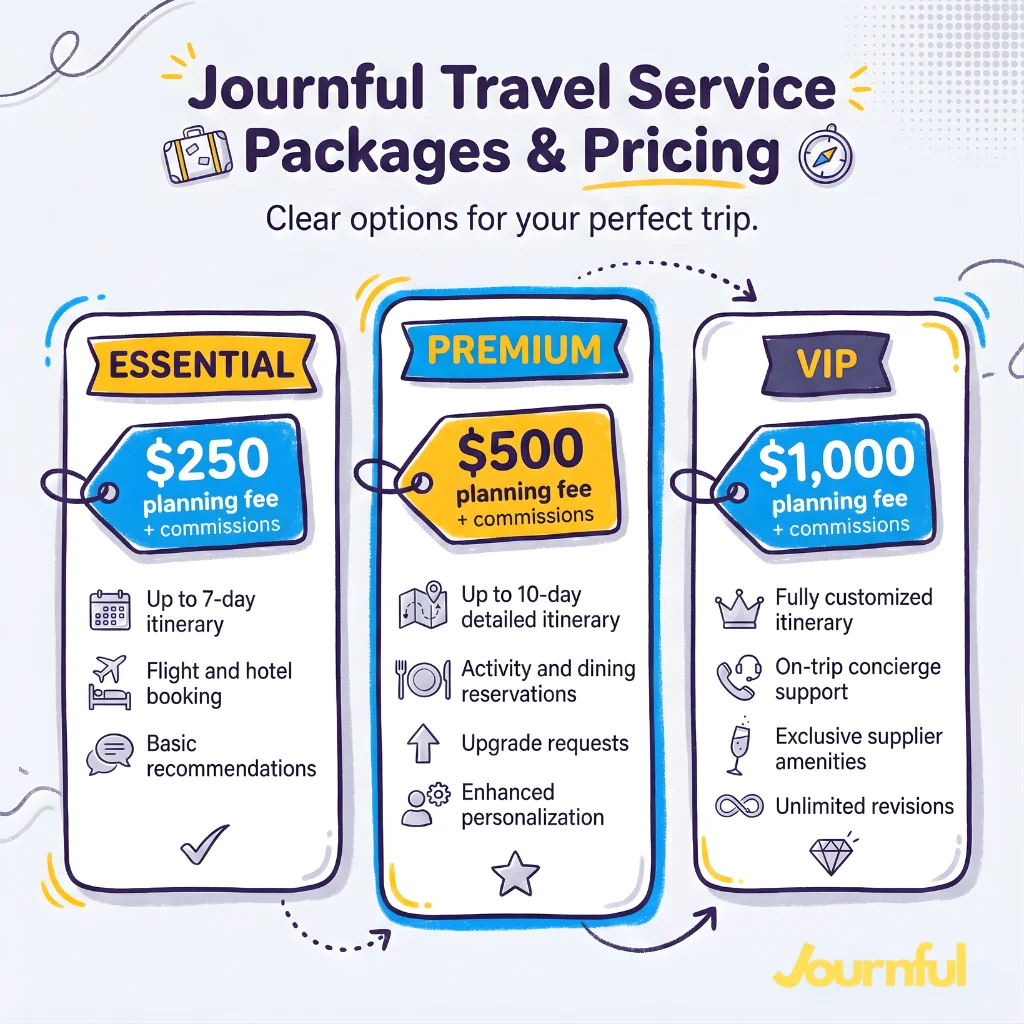
As you start booking real clients, you’ll naturally refine your pricing and inclusions. Actual trip requests will quickly show you which services take more time, where clients need more support, and what your expertise is truly worth.
Checklist
- List your core services and estimate time per trip
- Decide on flat fees, hourly rates, or a hybrid model
- Build 2–3 starter packages at different price points
Step 6: Build Your Online Presence
Your website is your digital storefront. It doesn’t need to be complicated — just clear, professional, and easy to navigate. A simple layout with a strong message and straightforward inquiry process will build trust faster than an overly designed site.
Website essentials
Your homepage should immediately answer three core questions:
- Who do you help?
- What problems do you solve?
- Why should someone choose you?
This is your value proposition, and it should be visible within the first few seconds of landing on your site.
Use a clean layout, simple navigation, and a strong call-to-action like “Book Inquiry” or “Request Planning.” High-quality destination images or clean workspace photos help reinforce your niche and strengthen trust. Make sure everything is optimized for mobile — most travelers browse trip ideas on their phones.
Must-have pages
Home: Your value proposition, niche, and clear CTA.
About: Your background, approach, and what makes your service different, focused on client benefits.
Services: Your packages, what’s included, and how your planning process works.
Contact: Clear contact options plus response expectations.
Trip Inquiry Form: A simple form with qualifying questions (destination, dates, group size, budget) to streamline communication.
Basic branding elements
Choose 2–3 brand colors, a clean, readable font pair, and images that reflect your niche. Keep your style consistent across your website, social media, and client materials. Cohesive branding helps clients feel they’re working with a professional.
Image Placeholder: Minimal travel advisor homepage mockup.
Website Launch Checklist
- Add your inquiry form with qualifying questions
- Set up your website platform
- Add your value proposition to the homepage
- Create your core pages (Home, About, Services, Contact)
Checklist
- Add your inquiry form with qualifying questions
- Set up your website platform (Outmerce, Wix, Showit, WordPress)
- Add your value proposition to the homepage
- Create your core pages (Home, About, Services, Contact)
Step 7: Set Up Your Trip Management & Client Workflow
Your workflow is the engine of your business. It determines how quickly inquiries move forward, how organized your planning feels, and how confident clients are in your process.
The 5 Core Systems Every Advisor Needs
A functional setup doesn’t require dozens of tools — just the right ones working together:
- Itinerary builder — delivers organized, easy-to-follow trip plans
- CRM — stores client records, trip details, timelines
- Proposal builder — presents offers and pricing professionally
- Contract system — sets expectations and protects your business
- Payment processor — handles invoices and planning fees
Why Consolidating Your Workflow Matters
Using fewer tools reduces errors, saves time, and keeps your entire client journey consistent. A streamlined system also helps you stay organized as inquiries and bookings grow.
Map Your “Lead-to-Departure” Journey
A simple, repeatable sequence is all you need:
Lead Form → CRM Profile → Proposal → Contract → Invoice → Itinerary
Image Placeholder:
👉 Linear workflow diagram: Lead → Proposal → Contract → Invoice → Itinerary
When every step is defined, you stay in control—and clients feel supported from the moment they inquire until the moment they depart.
Checklist
- Pick an all-in-one system like Journful
- Set up your lead forms
- Connect your payment processor
- Create reusable templates
- Test the workflow with a sample client
Step 8: Build Supplier Relationships & Learn Vendor Processes
Suppliers are central to a travel advisor’s success. Understanding their systems helps you book efficiently and professionally.
Why suppliers matter
Strong supplier relationships give you:
- Better support
- Faster problem resolution
- Access to exclusive offers
- Training and updates
Suppliers become partners in delivering exceptional client experiences.
How to join supplier programs
Most suppliers offer:
- Advisor registration portals
- New advisor training modules
- Webinars and product updates
- Support teams for questions
Some suppliers require a host agency affiliation or accreditation.
What information suppliers typically require
Expect to provide:
- Business information
- Host agency details (if applicable)
- Contact information
- Travel advisor identification or registration
Complete profiles make it easier to book quickly when client requests come in.

Checklist
- Identify suppliers for your niche
- Apply to supplier programs
- Complete required trainings
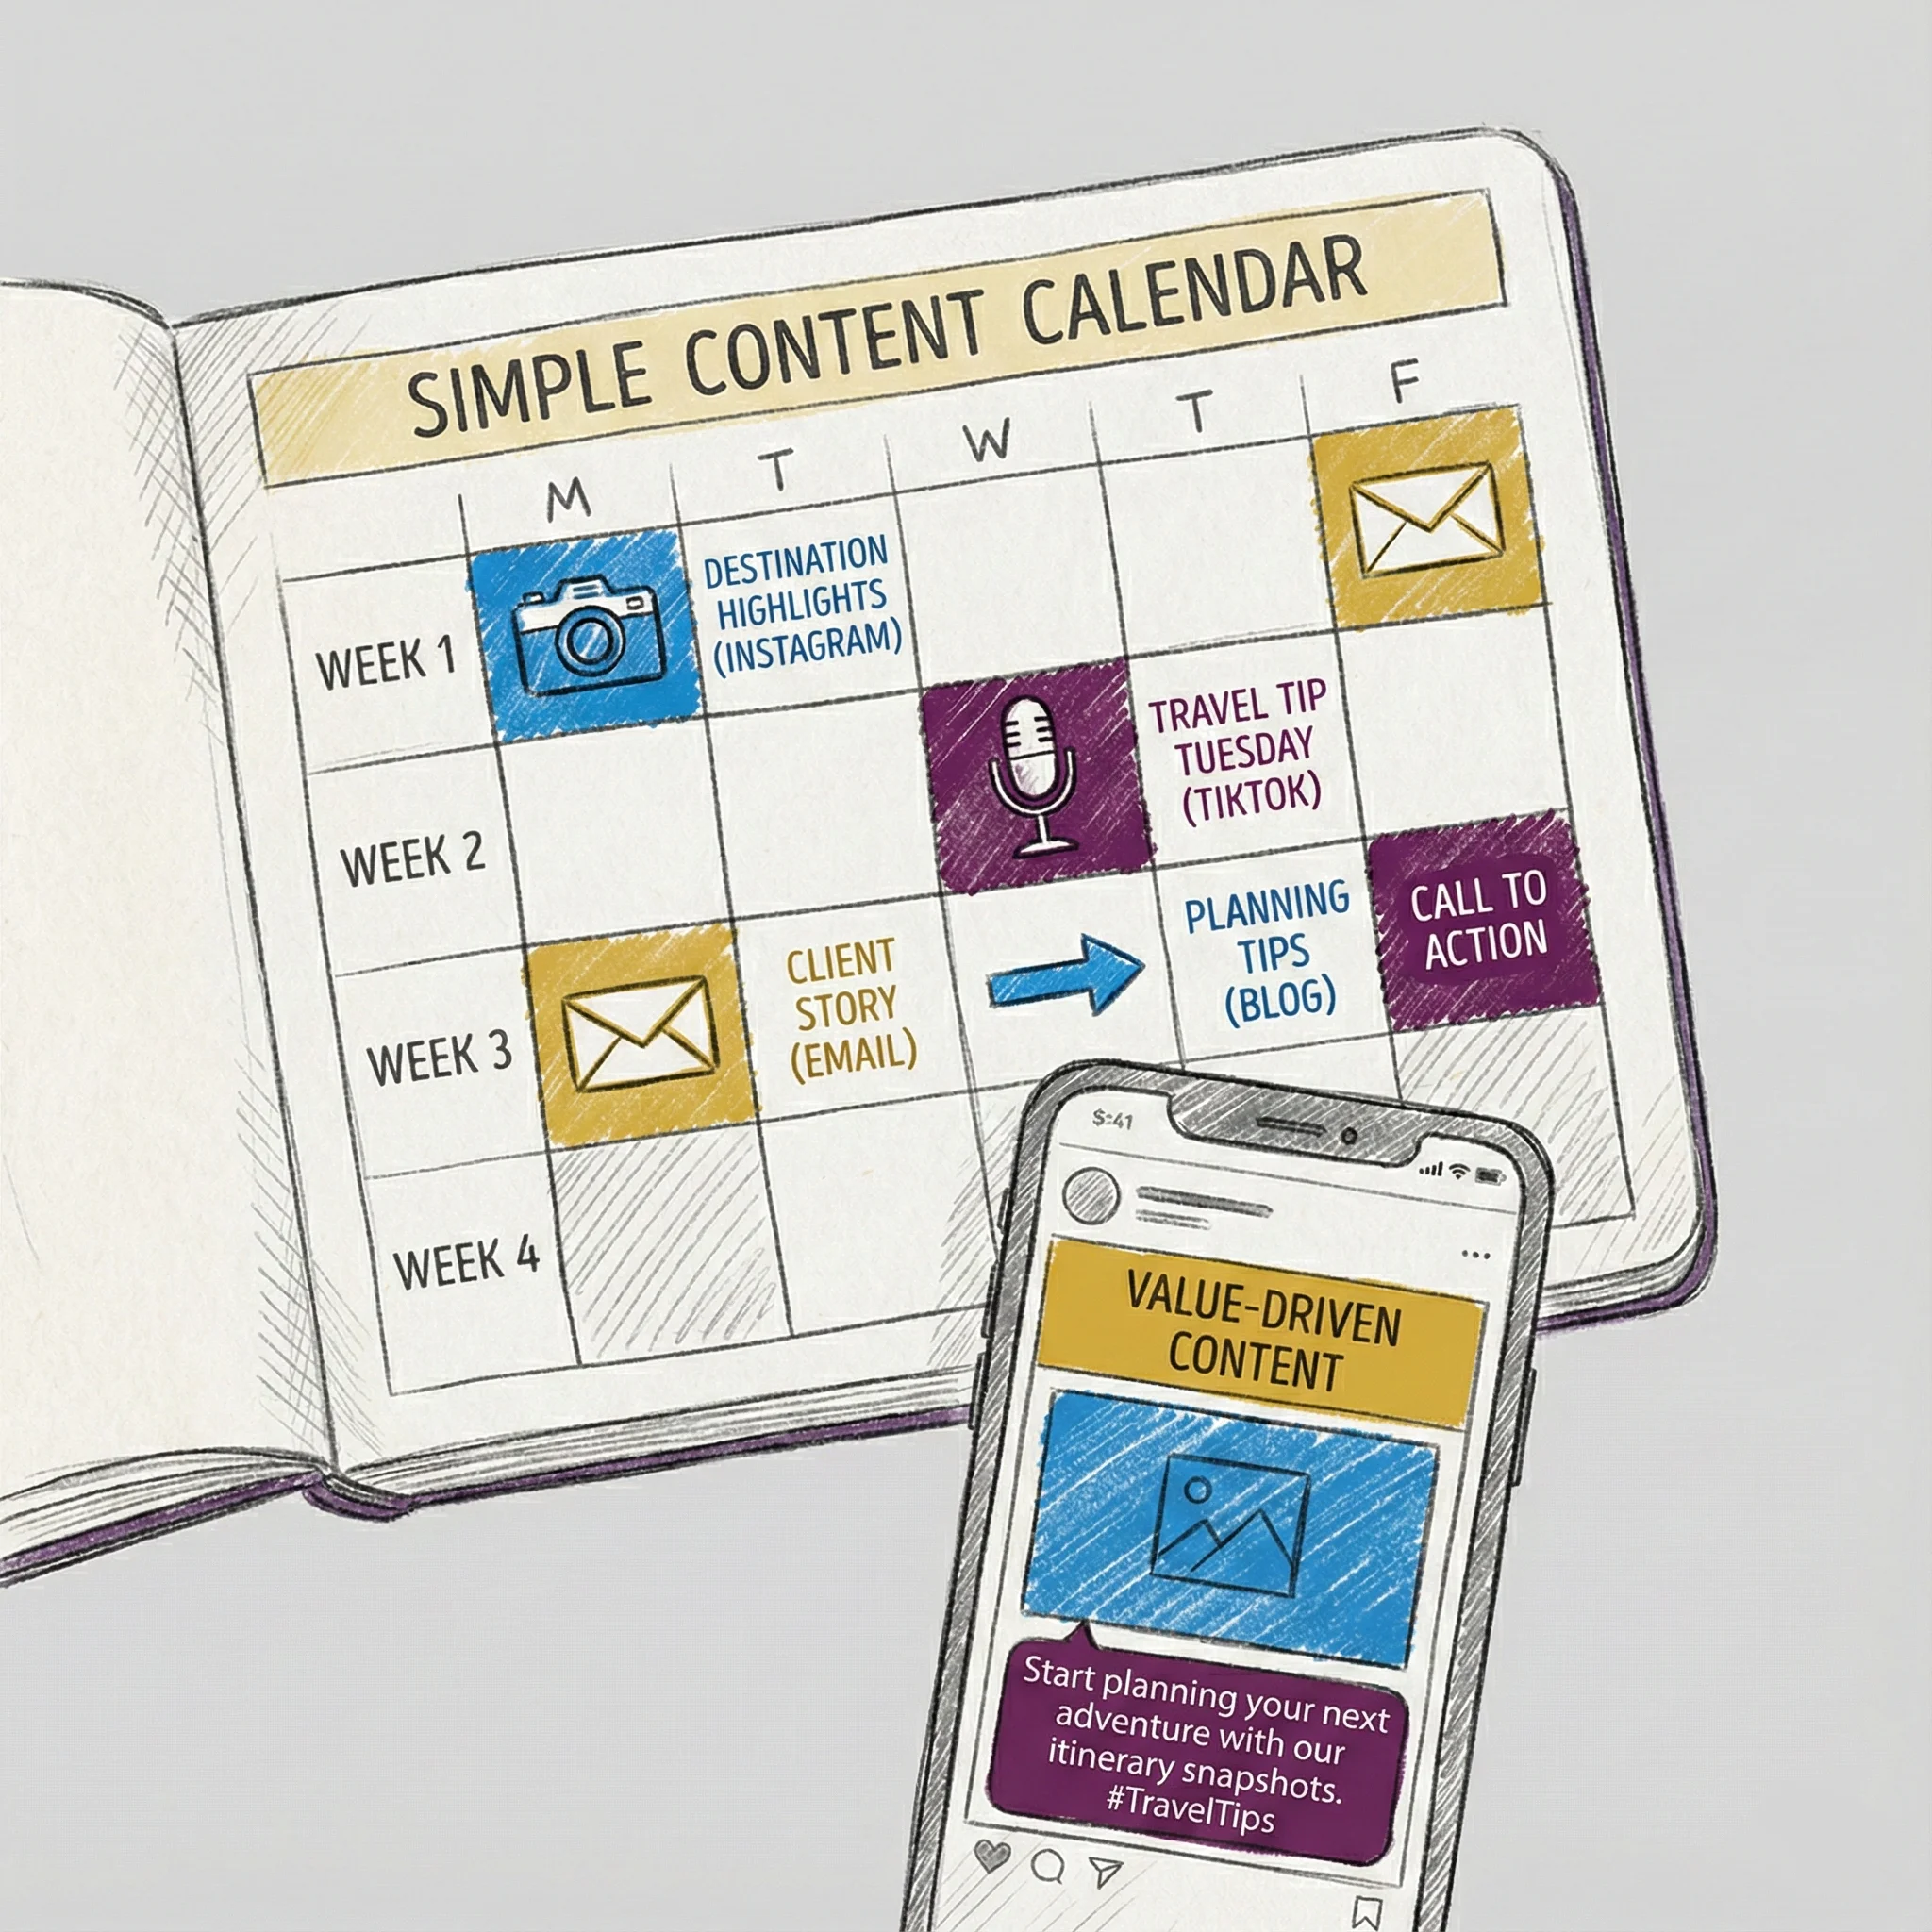
Step 9: Create a Simple Marketing Plan
Your marketing doesn’t need to be complex. Consistency is more important than perfect branding.
Pick 1–2 marketing channels to start
Choose platforms that match your strengths:
- TikTok
- Email newsletter
- Simple blog posts
Selecting fewer channels keeps you consistent.
What to post as a new advisor
Focus on practical, value-driven content:
- Destination highlights
- Itinerary snapshots
- Supplier product explanations
- Travel planning tips
- Client stories (with permission)
- Before/after comparisons showing your impact
This builds trust without requiring constant travel.
How to attract your first clients organically
Initial client acquisition is about showing up consistently:
- Share content within your niche
- Post clear calls to action
- Engage with relevant communities
- Offer value before selling
Organic leads often become your highest-quality long-term clients.
Checklist
- Choose 1 primary platform
- Post value-focused content
- Share travel tips, insights, and client stories
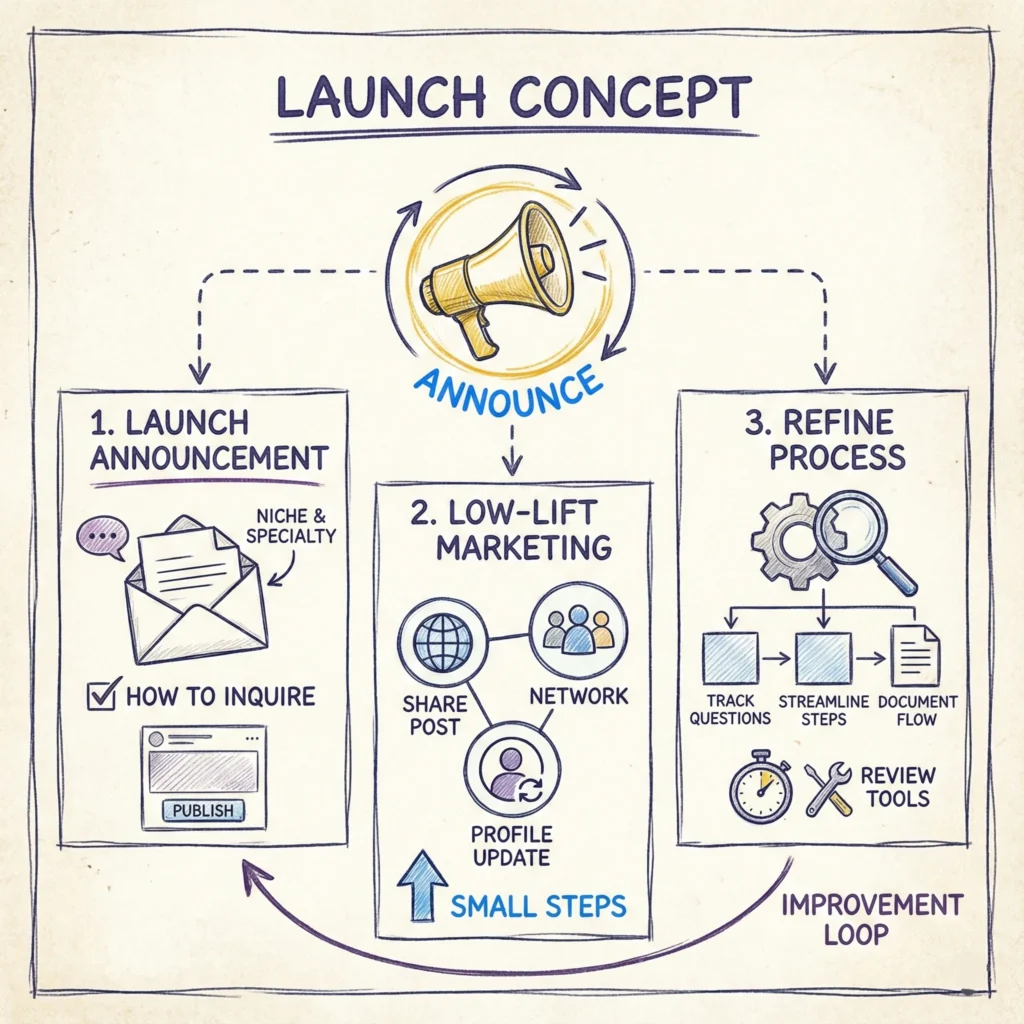
Step 10: Launch Your Business and Start Booking Clients
Your launch doesn’t need to be dramatic. A simple, confident announcement is enough to begin generating interest.
How to announce your launch
A strong launch message includes:
- Your niche
- Who you help
- What you specialize in
- How to inquire
Keep it simple, clear, and direct.
Start with low-lift marketing activities
Easy ways to generate momentum:
- Share your launch post across platforms
- Tell your personal network
- Update your online profiles
- Join communities relevant to your niche
Small steps compound quickly.
How to refine your process as you grow
Improvement comes from:
- Tracking questions clients ask repeatedly
- Streamlining steps that feel slow
- Documenting your workflow
- Reviewing your tools and updating as needed
A well-documented process saves hours as your business expands.
Checklist
- Write a simple launch announcement
- Tell your network & past travelers
- Document your client workflow
Journful Can Help You Get Started
A new travel advisor needs tools that keep everything organized, connected, and easy to manage as inquiries grow. Journful brings proposals, contracts, payments, timelines, tasks, and client portals into a single, clean workflow.
It gives new and growing advisors a structured system without the complexity of traditional travel CRMs. Instead of juggling multiple tools, everything stays in one place and follows the same organized process for every client.
For advisors who want clarity, professionalism, and simple systems from day one, Journful offers an affordable and intuitive foundation.
Start Your Journey Now
Starting a travel advisor business in 2026 is achievable with a clear plan, a focused niche, and a workflow that helps you operate smoothly from the beginning. The more organized your process, the easier it is to deliver exceptional trips and build a strong client base.
You don’t need perfection to start — you need structure, clarity, and a willingness to learn as you go. With the right tools and systems in place, you’ll be ready to serve travelers confidently and grow your business step by step.
Frequently Asked Questions (FAQ)
Do I need certification to become a travel advisor?
Certification is optional for most advisors. Many enter the industry through host agencies that provide training, supplier access, and business support. Certifications can help build confidence and credibility, but they’re not a requirement to start booking travel.
How much does it cost to start a travel advisor business?
Startup costs vary based on your business model. Advisors joining a host agency typically face lower upfront costs, which may include setup fees, software subscriptions, and basic marketing expenses. Independent advisors may have higher costs due to accreditation, supplier setup, and additional tools.
Do travel advisors need a host agency?
Not always. Host agencies simplify supplier access, training, and commission tracking — making them the most common choice for new advisors. Independent operation is possible but usually better suited to experienced advisors with established workflows.
How do travel advisors get paid?
Advisors earn through a mix of supplier commissions and service fees. Commissions are built into most travel products, while fees cover your planning time, expertise, and itinerary design. Both revenue streams can provide reliable income once your business is established.
How long does it take to become a travel advisor?
Most advisors can launch within a few weeks once they choose a host agency, set up their business foundations, and build a simple workflow. Mastery takes time, but launching does not need to be a lengthy process.
Can I do this part-time?
Yes. Many advisors start part-time and scale as demand grows. A structured workflow and clear communication help you manage clients effectively while balancing other commitments.
Do I need to be a specialist in destinations?
No. Destination expertise develops over time as you work with suppliers, attend trainings, and book real trips. What matters most at the beginning is choosing a niche, understanding your ideal client, and learning the planning process.